I’m not a super skilled card maker or scrapbook enthusiast, but I very much admire those who are. I like to dabble in it now and then, especially when it comes to my best friend’s birthday. It’s one of those special occasions that inspires me to break out the scrapbook paper and stamps. Each year, I strive to create a new and unique card that I think she’ll love. For me, cards are like tiny pieces of art; if you put your heart into it, they can become cherished keepsakes that are displayed for years to come. It’s a thoughtful way to show someone you care, and it always feels good to add a personal touch to a celebration.
Unleashing Joy: The Magic of Exploding Cards and Confetti Surprises
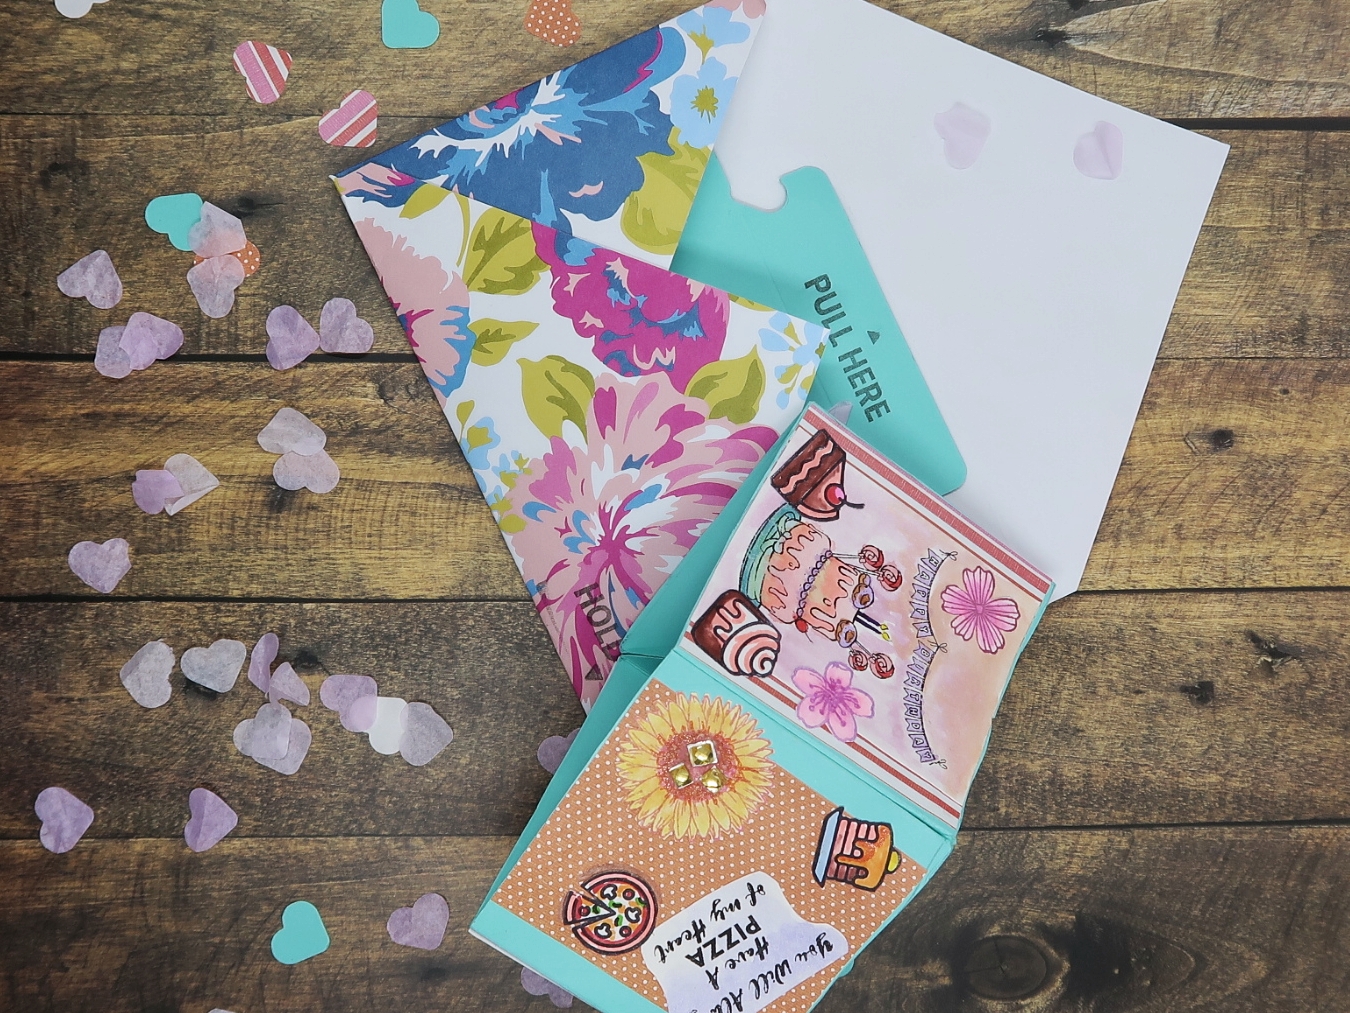
I’ve recently come across this adorable trend online where people are exchanging gift boxes that burst open with a flurry of tiny paper butterflies. It’s such a whimsical surprise that I thought, “How can I capture that same magic in a card?” After a bit of searching, I found this fantastic card-making gadget that does just that! You can flatten it down to easily fit in an envelope, and when you pull it out, it magically pops into a four-sided square card while showering you with heart-shaped confetti. How fun is that?! Honestly, who wouldn’t love receiving something so cheerful? It’s a sweet way to add a little extra joy to any occasion!
Elevate Your Card-Making
If you’re an experienced paper artist, you might already know about this device and its brand. However, for those who are just starting out in the world of paper crafts, let me introduce you to this incredible little tool! It’s called the Explosion Card Punch Board by We R Memory Keepers. This handy device is perfect for adding a special touch to your creations and is sure to bring a smile to anyone who receives one. If you’re interested in making a card yourself, you can check it out at the link below. Did I mention that this same device also helps you make the envelope for the card?! How handy!

CREATE CARDS THAT POP: This innovative punch board will help you create amazing cards that burst open in a shower of confetti when opened!
Crafting a Magical Surprise Card: A Step-by-Step Guide
Creating a magical surprise card for someone special is easier than you might think! All you really need is this handy crafting device, some sturdy card stock, and a few sheets of colorful scrapbook paper. Depending on your style, you might want to add some stamps, markers, or even a splash of paint. Don’t forget the essentials like glue and tape, and of course, a sprinkle of your own creativity! It’s a fun way to show you care and make someone smile. Let your personality shine through – after all, it’s the thought and effort that make it truly special!
If you're wanting to re-create a card like ours, we'll walk you through the steps we took to put this creation together.
- Choose the card stock for the base and follow the instructions provided with the pop-up card maker.
You can get the card stock I used for this project here.

Comes in multiple beautiful shades for every project.
- Cut out four squares of scrapbook paper that are the same size as your pop-up card.
- Using stamps, create small designs that you can arrange on each side of your card. For this project, I chose to use a few of my stamp collections by Recollections. I’ve included a link to the food stamp collection below.

This jar of wood stamps feature a variety of yummy food themes. Use them to add charm to your stationery, DIY crafts, and other creative projects!

- I generally stamp my images on a sheet of white card stock and then color or paint them as I like. Once they are dry, I cut them out for the next step.

Craft Tip: Use permanent waterproof ink pad for stamps you don’t want to bleed when you paint with markers or watercolors. I’ve linked what I used below.
I used Art 101 rainbow brush and pastel brush markers for coloring in the food stamps. I’ve linked a similar pen below.

Watercolor brush pens provide a variety of colors to choose from when creating your next watercolor creation. These pens allow you to easily add color to your paintings with precision, and they’re mess-free and easy to clean up.

The ink is archival quality that provides long lasting results and are permanent on many surfaces
- For the text bubbles, I decided to use Canva. I selected a 5×5 inch square card as my template. After completing my text designs in Canva, I downloaded the image and resized it to the dimensions I needed in Microsoft Word. I then printed the design using my laser printer and painted over it with watercolors.

This travel watercolor paint set I used is so much fun. Don’t let its tiny size fool you, this tiny paint set packs a punch. It includes 18 colors, a sponge for cleaning your brush, color mixing trays and a paint brush that can be filled with water.

19 pc travel-friendly Watercolor Art Set – 18 Watercolors, 1 Aqua-Flo Pen
- Arrange your cut-out stamped images and text bubbles on your scrapbook paper, and then glue them down. This is the fun part, as you can be as creative as you like! Feel free to add jewels, ribbon, buttons, stickers, and more—whatever inspires you!
- Glue your decorated scrapbook pages to your card stock base.


- Attach your rubber band to the inside of your card stock box.
- Make your box tray and envelope according to the directions provided with the Memory Keeper card maker.

- Cut out additional heart confetti using your card maker. (Tip: Tissue paper flutters the longest, so consider making a mix of confetti from leftover scrapbook paper and tissue paper.)

Load everything into your envelope and get ready to delight your friends!

Crafting a Meaningful Keepsake : Crafting Unique Surprise Cards
I hope you enjoy making your pop-up cards as much as we do. I hope this glimpse into our creative process inspires you to experiment with your own designs! Whether it’s using Canva, using stamps or painting with watercolors, there are endless possibilities to explore with this card making technique. it’s a fun way to celebrate a special occasion with a special someone and also a way of creating something unique that they can cherish forever.
We’d Love To Hear From You!
If you’re into DIY projects or have your own tips for creating unique designs, we’d love to hear from you! Please share your thoughts in the comments below. What’s your favorite tool for design, or do you have any watercolor techniques to recommend? Also don’t forget to subscribe to our newsletter and follow us on social media for more creative ideas and inspiration. Let’s unleash our creativity together!
Want more crafting inspiration? Check out our blogs below!


Let us know what you think